Using GenPipes for genomic analysis
This document describes the GenPipes execution environment and how to use various genomic analysis pipelines. It assumes you already have access to GenPipes through one of the available GenPipes Deployment Options.
Topics covered in this document includes information regarding what is available in a typical GenPipes deployment and how to access it. Besides that it covers details on required software and environment configurations, various kinds of inputs required to run genomic analysis such as command options, configuration details, readset file and design file. There are example runs highlighting how to issue the pipeline commands with requisite inputs and pipeline specific configurations.
GenPipes Executable
GenPipes framework can be used to perform various genomic analysis corresponding to the available pipelines. GenPipes is a command line tool. The underlying object-oriented framework is developed in Python. It simplifies the development of new features and its adaptation to new systems; new workflows can be created by implementing a Pipeline object that inherits features and steps from other existing Pipeline objects.
Similarly, deploying GenPipes on a new system may only require the development of the corresponding Scheduler object along with specific configuration files. GenPipes’ command execution details have been implemented using a shared library system, which allows the modification of tasks by simply adjusting input parameters. This simplifies code maintenance and makes changes in software versions consistent across all pipelines.
Running GenPipes
Pre-Requisites
Before running GenPipes, you may want to visit the checklist of pre-requisites for GenPipes.
Usage
Here is how you can launch GenPipes. Following is the generic command to run GenPipes:
<pipeline-name>.py -c config -r readset-file -s 1-n -g list-of-commands.txt
bash list-of-commands.txt
where:
<pipeline-name> refers to one of the available GenPipes Pipelines
-s <step-range-number-1-n> refers to the specific steps in the pipeline that need to be executed
-c refers to the configuration file, multiple files can be specified, say one for cluster specific configuration and another that is pipeline specific configuration settings
-r readset file, an input file required by the pipeline
-g the commands for running the pipeline are output to this file.
Terminology
In the context of GenPipes, you need to be familiar with the following terms. These constitute inputs and configuration required before you can launch the pipelines.
Launching GenPipes
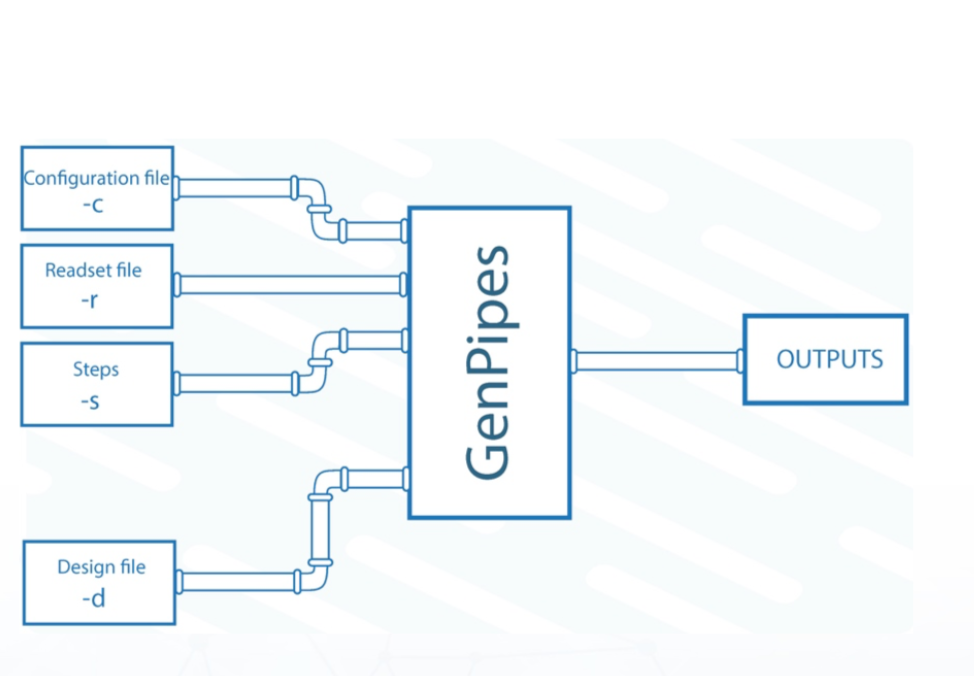
To launch GenPipes, the following is needed:
Name of the pipeline corresponding to one of the available GenPipes Pipelines.
A readset file that contains information about the samples, indicated using the flag “-r”. GenPipes can aggregate and merge samples as indicated by the readset file.
Configuration/ini files that contain parameters related to the cluster and the third-party tools, indicated using the flag “-c”. Configuration files are customizable, allowing users to adjust different parameters.
The specific steps to be executed, indicated by the flag “-s”.
In addition to the configuration files and the input readset file, certain pipelines such as ChIP-Seq and RNA sequencing (RNA-Seq), require a design file that describes each contrast. Custom sample groupings can be defined in the design file. Design files are indicated by the flag “-d”. More information on the design file and the content of each file type can be found in the GenPipes User Guide.
Example Run
The following example shows how you can run Hi-C sequencing pipeline using GenPipes installed on Compute Canada data centres. Please ensure you have login access to GenPipes servers. Refer to checklist of pre-requisites for GenPipes before you run this example.
We will now run the pipeline using a test dataset. We will use the first 2 million reads from HIC010 from Rao et al. 2014 (SRR1658581.sra). This is an in-situ Hi-C experiment of GM12878 using MboI restriction enzyme.
You need to first download the test dataset by visiting this link:
In the downloaded zip file, you will find the two fastq read files in folder “rawData” and will find the readset file (readsets.HiC010.tsv) that describes that dataset.
Please ensure you have access to “beluga” server in Compute Canada data centre. We will run this analysis on beluga as follows:
hicseq.py -c $MUGQIC_PIPELINES_HOME/pipelines/hicseq/hicseq.base.ini $MUGQIC_PIPELINES_HOME/pipelines/common_ini/beluga.ini -r readsets.HiC010.tsv -s 1-15 -e MboI -g hicseqScript_SRR1658581.txt
To understand what $MUGQIC_PIPELINES_HOME refers to, please see instructions on how to access GenPipes on Compute Canada servers.
In the command above,
-c defines the ini configuration files
-r defines the readset file
-s defines the steps of the pipeline to execute. To check pipeline steps use hicseq -h
-e defines the restriction enzyme used in the HiC library
By default, on Compute Canada servers such as “Cedar”, “Beluga” or “Graham”, SLURM scheduler is used. On abacus server, you need to use PBS scheduler. For that you need to specify “-j pbs” option as shown below:
hicseq.py -c $MUGQIC_PIPELINES_HOME/pipelines/hicseq/hicseq.base.ini $MUGQIC_PIPELINES_HOME/pipelines/common_ini/abacus.ini -r readsets.HiC010.tsv -s 1-15 -e MboI -j pbs -g hicseqScript_SRR1658581.txt
The above command generates a list of instructions that need to be executed to run Hi-C sequencing pipeline. These instructions are stored in the file:
hicseqScript_SRR1658581.txt
To execute these instructions, use:
bash hicseqScript_SRR1658581.txt
Warning
You will not see anything happen, but the commands will be sent to the server job queue. So do not run this more than once per job.
To confirm that the commands have been submitted, wait a minute or two depending on the server and type:
showq -u <userID>
where, <userID> is your login id for accessing Compute Canada infrastructure.
In case you ran it several times and launched too many commands you do not want, you can use the following line of code to cancel ALL commands:
showq -u <userID> | tr "|" " "| awk '{print $1}' | xargs -n1 canceljob
Note
Congratulations! You just successfully issued the Hi-C sequencing analysis pipeline commands!!!
After the processing is complete, you can access quality control plots in the homer_tag_directory/HomerQcPlots. You can find the compartment data in the compartments folder, TADs in the TADs folder and significant interactions in the peaks folder.
For more information about output formats please consult the webpage of the third party tool used.
Note
The Hi-C sequencing pipeline also analyzes capture hic data if the “-t capture” flag is used. For more information on the available steps in that pipeline use:
hicseq -h
Example Run with Design File
Certain pipelines that involve comparing and contrasting samples, need a Design File. The design file can contain more than one way to contrast and compare samples. To see how this works with GenPipes pipelines, lets run a ChIP-Sequencing experiment.
ChIP-Sequencing Test Dataset
We will use a subset of the ENCODE data. Specifically, the reads that map to chr22 of the following samples ENCFF361CSC and ENCFF837BCE. They represent a ChIP-Seq analysis dataset with the CTCF transcription factor and its control input.
First, you need to download the test dataset from here.
In the downloaded zip file, you will find the two fastq read files in folder rawData and will find the readset file (readsets.chipseqTest.chr22.tsv) that describes that dataset. You will also find the design file (designfile_chipseq.chr22.txt) that contains the contrast of interest.
Following is the content of the Readset file (readsets.chipseqTest.tsv):
Sample Readset Library RunType Run Lane Adapter1 Adapter2 QualityOffset BED FASTQ1 FASTQ2 BAM
ENCFF361CSC_ctrl ENCFF361CSC_chr22 SINGLE_END 2965 1 AGATCGGAAGAGCACACGTCTGAACTCCAGTCA AGATCGGAAGAGCGTCGTGTAGGGAAAGAGTGT 33 rawData/ENCFF361CSC.chr22.fastq
ENCFF837BCE_ctcf ENCFF837BCE_chr22 SINGLE_END 2962 1 AGATCGGAAGAGCACACGTCTGAACTCCAGTCA AGATCGGAAGAGCGTCGTGTAGGGAAAGAGTGT 33 rawData/ENCFF837BCE.chr22.fastq
This analysis contains 2 samples with a single readset each. They are both SINGLE_END runs and have a single fastq file in the “rawData” folder.
Following is the content of the Design file (designfile_chipseq.txt):
Sample CTCF_Input,N
ENCFF361CSC_ctrl 1
ENCFF837BCE_ctcf 2
We see a single analysis CTCF_Input run as Narrow peaks (coded by “N”; you can use “B” for broad peak analysis). This analysis compares CTCF peaks in ENCFF837BCE_ctcf to its input control peaks identified from ENCFF361CSC_ctrl.
Let us now run this ChIP-Sequencing analysis on beluga server at Compute Canada using the following command:
chipseq.py -c $MUGQIC_PIPELINES_HOME/pipelines/chipseq/chipseq.base.ini $MUGQIC_PIPELINES_HOME/pipelines/common_ini/beluga.ini -r readsets.chipseqTest.chr22.tsv -d designfile_chipseq.chr22.txt -s 1-15 -g chipseqScript.txt
bash chipseqScript.txt
The commands will be sent to the job queue and you will be notified once each step is done. If everything runs smoothly, you should get MUGQICexitStatus:0 or Exit_status=0. If that is not the case, then an error has occurred after which the pipeline usually aborts. To examine the errors, check the content of the job_output folder.
Submitting GenPipes Pipeline Runs
HPC site policies typically limit the number of jobs that a user can submit in a queue. These sites deploy resource schedulers such as Slurm, or PBS/Torque for scheduling and sharing of HPC resources. Integrating with the resource schedulers and dealing with resource constraints are critical to ensuring productivity of HPC users. GenPipes caters to these user pain points through intelligent utilities that help in smartly chunking and submitting pipeline runs, resubmitting the jobs and ensuring that there are no errors in scheduler calls.
GenPipes offers a utility scripts namely, `chunk_genpipes.sh` and `submit_genpipes` to enable better integration with resource schedulers (Slurm, PBS/Torque) deployed on HPC clusters.
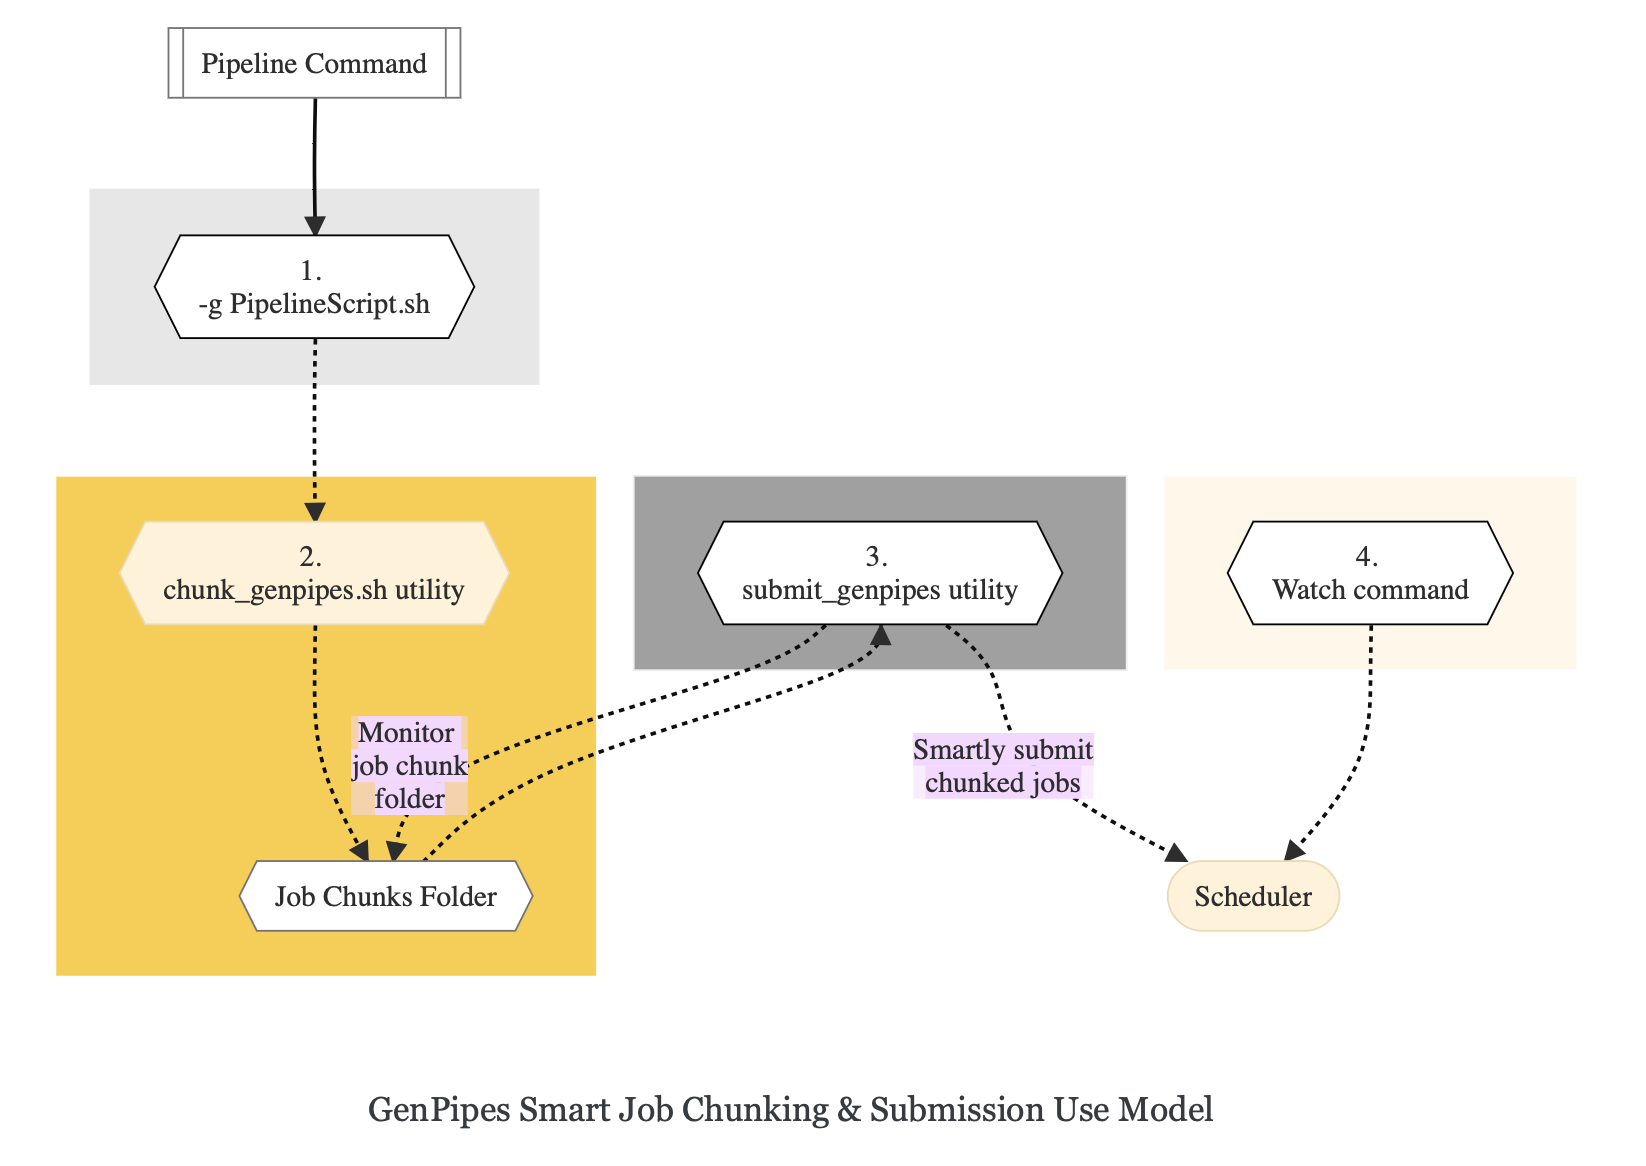
The usage model is as follows. First, you need to issue GenPipes pipeline command with -g GENPIPES_FILE option to store all pipeline commands in a bash script. Next, you need to use the utility called `chunk_genpipes.sh` that takes as input this bash script file GENPIPES_FILE and chunks scheduler jobs into a folder `job_chunks` (default) or the one you specify. Note that chunk_genpipes.sh utility is supposed to be run for a pipeline bash script only once. After successful chunking, user can use the `submit_genpipes` utility to smartly submit the pipeline jobs to the scheduler without having to worry about scheduler integration and exceeding queue limits as these utilities take care of that. Better HPC integration is offered by `submit_genpipes` as it looks for any error in the calls made to the scheduler and makes sure to auto-correct them based on chunking limits specified through `chunk_genpipes.sh` earlier.
The `submit_genpipes` script lets GenPipes users manage resource constraints in a flexible and robust manner. GenPipes user can delegate job submission to this script and use `watch` command to monitor the submitted jobs. At any time, GenPipes users can stop monitoring the submitted jobs by issuing `Ctrl-C` to a running `watch` command in the terminal. After a clean `ctrl-C` stop of or if the watch command was killed in another manner, for example when a session is killed after ssh disconnection, users can restart monitoring GenPipes jobs to the queuing system by simply invoking the `watch` command again.
The `submit_genpipes` script comes with a fail safe mechanism that will resubmit jobs that failed to be sent to the scheduler up to 10 times (default).
Example: Submitting hicseq.py jobs
Here is an example of to use the `submit_genpipes` script with HiC Sequencing Pipeline:
M_FOLDER=path_to_folder

hicseq.py <options> --genpipes_file hicseq_script.sh

$MUGQIC_PIPELINES_HOME/utils/chunk_genpipes.sh hicseq_script.sh $M_FOLDER

$MUGQIC_PIPELINES_HOME/utils/submit_genpipes  $M_FOLDER
The `chunk_genpipes.sh` script is used to create job chunks of specified size that are submitted at a time. Please note that this script should be executed only once before using `submit_genpipes` to submit jobs.
Note
The
`submit_genpipes`script can be run for multiple GenPipes pipelines simultaneously, to`submit jobs`belonging to respective pipelines. You need to ensure that each submit_genpipes script invocation refers to a different job_chunks folder corresponding to the pipeline.`submit_genpipes`script runs can be stopped by`Ctrl-C`keystroke and restarted at will.`submit_genpipes`script has intelligent lock mechanism that prevents invoking two simultaneous runs of`submit_genpipes`in parallel, on the on the same job chunking folder or GenPipes pipeline run.
Figure below demonstrates how `submit_genpipes` utility works. The pipeline command file output is fed into `chunk_genpipes.sh` script which creates the chunks folder as a one time activity. This chunk folder is monitored by the `submit_genpipes` script.
For a complete list of available GenPipes utilities, refer to the `genpipes/util` folder in the source tree.
Sample Output
This section demonstrates how a GenPipes user can chunk job submission and submit job, monitor their status using `chunk_genpipes.sh` and `submit_genpipes` utilities and `watch` command.
After generating GenPipes command file, say for GenPipes DNASeq Pipeline, ‘dnaseq.sh`, follow these two steps:
Step 1: Use chunk size 20 to chunk command submission to the scheduler
chunk_genpipes.sh dnaseq.sh job_chunks 20
Note
In the command above, 20 specifies the number of jobs in a chunk
Figure below shows the output of the command above:
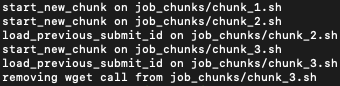
Output of chunk_genpipes command
Step 2: Invoke submit_genpipes script to monitor the submitted GenPipes jobs
submit_genpipes job_chunks -n 800
Note
In the command above, 800 refers to the total number of jobs that can be submitted simultaneously at a time to the scheduler.
Figure below shows the output of the submit_genpipes command:
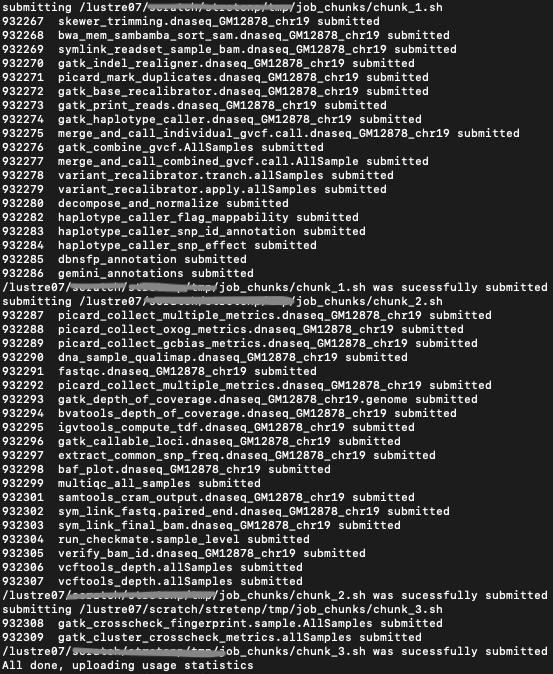
Output of submit_genpipes command
Further Information
GenPipes pipelines are built around third party tools that the community uses in particular fields. To understand the output of each pipeline, please read the documentation pertaining to the tools that produced the output.
You can see all available GenPipes pipelines for a complete listing of all supported pipelines. To see examples of running other pipelines and also for figuring out how to run pipelines locally or in the cloud on your own GenPipes deployment, refer to GenPipes Tutorials.
For further information or help with particular pipelines, you can send us an email to: